By Martin Lehner (@anotherlehner)
We start a libtcod project by opening a simple window with nothing in it. Using the C API this looks like the following:
// import the libtcod C headers -- these are automatically translated for use by Zig!
const c = @cImport({
    @cInclude("libtcod.h");
});

// using small values now because the resulting window is large and easy to see
const SCREEN_WIDTH = 40;
const SCREEN_HEIGHT = 25;

pub fn main() anyerror!void {
    // create the root console, which opens a window of a given character size (note: not screen size!)
    // this call also includes the title of the window, whether it's full screen or not, and the renderer
    _ = c.TCOD_console_init_root(SCREEN_WIDTH, SCREEN_HEIGHT, "Zig Roguelike", false, c.TCOD_RENDERER_SDL2);

    // we need to make sure that when our program exits we call the TCOD_quit function to clean things up
    // Zig provides the defer keyword for this; in this case this defer block will be executed on main exit
    defer {
        c.TCOD_quit();
    }

    // create an instance of the TCOD_key_t C struct containing default values, undefined for things we don't need
    var key = c.TCOD_key_t{ .vk = c.TCODK_NONE, .c = 0, .text = undefined, .pressed = undefined, .lalt = undefined, .lctrl = undefined, .lmeta = undefined, .ralt = undefined, .rctrl = undefined, .rmeta = undefined, .shift = undefined };

    // while the window hasn't been closed we want to process events and respond to them
    while (!c.TCOD_console_is_window_closed()) {
        // render the drawn console to the screen
        _ = c.TCOD_console_flush();

        // check for key press events -- internally this function call will modify the "key" struct values
        // we need to have this function call otherwise tcod won't work correctly
        _ = c.TCOD_sys_check_for_event(c.TCOD_EVENT_KEY_PRESS, &key, null);
    }
}
Zig makes calling into C really easy. All we need to do is use the @cImport built-in function to include the libtcod.h header file in the source. The libtcod library binary itself is configured the same way we already covered in part 0.
Note here that lines with _ = ... are explicitly ignore return results. These function calls return potential errors or data that I don’t need or don’t want to handle at the moment.
To draw something on the window we’ve created we need to just add a few function calls. We’re going to use a custom font by specifying a png containing the collection of glyphs we want to use and then draw a single @ symbol on the screen.
const c = @cImport({
    @cInclude("libtcod.h");
});

const SCREEN_WIDTH = 40;
const SCREEN_HEIGHT = 25;

// integer value of the @ symbol in ascii
const ASCII_AT = 64; // @

pub fn main() anyerror!void {
    _ = c.TCOD_console_init_root(SCREEN_WIDTH, SCREEN_HEIGHT, "Zig Roguelike", false, c.TCOD_RENDERER_SDL2);
    defer { c.TCOD_quit(); }

    var key = c.TCOD_key_t{ .vk = c.TCODK_NONE, .c = 0, .text = undefined, .pressed = undefined, .lalt = undefined, .lctrl = undefined, .lmeta = undefined, .ralt = undefined, .rctrl = undefined, .rmeta = undefined, .shift = undefined };

    // we add two variables to hold player x and y coordinates, i'm using "var" here instead of const since we'll want to
    // change these in the next step where we start moving the player around
    var playerX: i16 = SCREEN_WIDTH / 2; // initial player x position
    var playerY: i16 = SCREEN_HEIGHT / 2; // initial player y position

    // here we set the font using a path to the png file containing the character set, the flags here for greyscale and layout
    // tell libtcod about the font file and how they'll be displayed
    _ = c.TCOD_console_set_custom_font("../dejavu10x10_gs_tc.png", c.TCOD_FONT_TYPE_GREYSCALE | c.TCOD_FONT_LAYOUT_TCOD, 0, 0);

    while (!c.TCOD_console_is_window_closed()) {
        // finally we need to display the glyph on the screen, we do so with this tcod function, the player coordinates,
        // and a little constant that gives the integer ascii value of the @ symbol
        c.TCOD_console_set_char(null, playerX, playerY, ASCII_AT);

        _ = c.TCOD_console_flush();
        _ = c.TCOD_sys_check_for_event(c.TCOD_EVENT_KEY_PRESS, &key, null);
    }
}
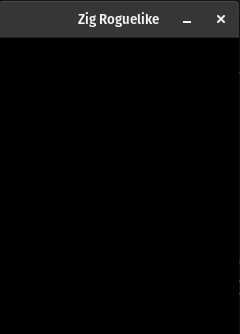
Building and running this (remember zig build run) gets us the following screenshot of a mostly empty window with an @ symbol hanging out in the middle: screenshot.
This section is really the protein of part 1: we want to make the player glyph move around when we press the arrow keys on the keyboard.
We’re already getting key press events, we just don’t do anything with them yet. Before we get to the actual process of handling keys though lets build some additional tools to represent this work. Following the general ideas of the roguelike tutorial in Python I decided to create structures to represent different types of “action” the player could be taking. One obvious action is move (up, down, left, right, etc), but there’s some meta-actions too like quitting the game, perhaps opening a menu, etc…
Here are the structures:
// Structs for the available action types
const EscapeAction = struct {};
const MoveAction = struct { dx: i16, dy: i16 };

// This enum is used to create a tagged union of actions
const ActionTypeTag = enum {
    escapeAction,
    moveAction,
};

// Action type union; this structure can only have 1 active union value at a time
// and can be used in switch statements!
const ActionType = union(ActionTypeTag) {
    escapeAction: EscapeAction,
    moveAction: MoveAction,
};
Starting at the top I first define 2 structs: EscapeAction and MoveAction. Escape doesn’t have anything else special in it for context, just an empty struct. The move action will need to carry around which direction the player needs to move so we keep track of both of those as signed integers (I’m not sure if 16-bit will eventually be big enough but it should get us going for now).
The second bit we have here is ActionTypeTag, which requires a little more explanation: This enum gets us a set of discrete values we can use as “labels” for the third structure we’re going to talk about. For now just think of this enum as a bag of constant values that we’ll just use as names for other things.
The third section here is where we put the two ideas together. Something we’ll need to do when receiving key press events is to determine what action happened and then handle it. Here’s the timeline:
- receive a key press event
- determine what action the key press represents (if any!)
- process the action
A union type is cool because we can combine it with our “labels” from ActionTypeTag to get a structure that contain exactly 1 action out of a set of possible actions, with names attached for each one. Not only that but we can use a switch statement to determine which action it is we’re handling and make sure all of the possible cases have been handled! This approach uses the compiler to help us make sure we’re handling all the cases. I prefer things to fail at compiler rather than run time and compiler features like this (and static typing) help me to do that. … and allow me to think harder about other things!
I realize the above may sound a bit muddled and hey, this is first draft so there’s bound to be some mud around but let’s look at the processing pieces that tie these ideas together and I think you’ll see they fit.
First let’s turn the key presses into actions. In the main function we need to add something like this:
pub fn main() anyerror!void {
    ... // ill be using ... to represent sections of code that haven't changed since previous examples

    while (!c.TCOD_console_is_window_closed()) {
        const optionalAction = evKeydown(key);
        if (optionalAction) |action| {
            // todo
        }
    }
}

fn evKeydown(key: c.TCOD_key_t) ?ActionType {
    // todo
}
I’ve added a placeholder function (evKeydown) here that we’ll fill in later. What it will do is take the key variable we have received our key press event information in from libtcod and determine from it what action should be taken. Notice the question mark on the return type of the placeholder function? ?ActionType means that this function will return an ActionType structure OR null. This is called an optional and Zig has built-in syntax to work with them. Any time we have something that is potentially null we should use an optional to make sure we’re being careful handling that and avoiding a crash.
In the while loop we add a line to get the potential action from evKeydown:
const optionalAction = evKeydown(key);
const is just a variable that will not change. It’s important to use features like const as much as possible so we minimize the amount of changing state. This is less for my little monkey brain to keep track of but is also good practice as less changing state is easier to keep track of, easier to reason about, easier to test, and will come in handy later if we need multithreading since multiple threads reading an immutable value is much safer than having two threads coordinate their access to changing state. Not that we’ll never need it but reducing the scope is important for all the same reasons above.
To use the optional Zig has built-in support for checking an optional contains a value and then doing something with that “wrapped” value inside the optional:
if (optionalAction) |action| {
    // todo
}
This reminds me a lot of Ruby or Groovy where | bar characters are used to house variable inputs to a block.
Let’s fill in that evKeydown function to determine and create actions:
// This function takes a keydown event key and returns an optional action type to respond to the event
fn evKeydown(key: c.TCOD_key_t) ?ActionType {
    return switch (key.vk) {
        c.TCODK_ESCAPE => ActionType{ .escapeAction = EscapeAction{} },
        c.TCODK_UP => ActionType{ .moveAction = MoveAction{ .dx = 0, .dy = -1 } },
        c.TCODK_DOWN => ActionType{ .moveAction = MoveAction{ .dx = 0, .dy = 1 } },
        c.TCODK_LEFT => ActionType{ .moveAction = MoveAction{ .dx = -1, .dy = 0 } },
        c.TCODK_RIGHT => ActionType{ .moveAction = MoveAction{ .dx = 1, .dy = 0 } },
        else => null
    };
}
This code uses a switch on the key.vk value (it contains the key code returned from libtcod) and creates a struct for whichever type of key was pressed. Notice that:
else section of the switch just returns null, this is an optional without a value, out if-statement above would skip processing the action if it had null in itThe last step in the timeline is to handle the action and apply it’s affects. To do this we only need to add another switch statement inside our if-statement checking the optional action:
if (optionalAction) |action| {
    switch (action) {
        ActionType.escapeAction => return,
        ActionType.moveAction => |m| {
            playerX += m.dx;
            playerY += m.dy;
        },
    }
}
Finally we arrive at the point I hinted at way above when talking about ActionTypeTag and ActionType. Combining the ActionType union with an enum gets us something called a “tagged union”. Tagged unions can be processed by a switch statement in Zig and easily allow us to:
Here’s what happens if you exclude the move action from the switch:
./src/main.zig:60:13: error: enumeration value 'ActionTypeTag.moveAction' not handled in switch
            switch (action) {
            ^
Awesome! The compiler caught a potential mistake! This is the type of feedback I really appreciate while coding.
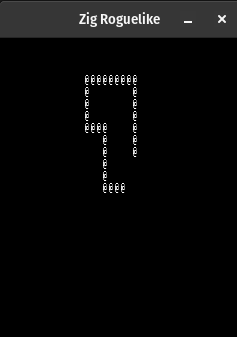
Here’s what it looks like when I fire this up and use the arrow keys to move around: screenshot.
That screenshot doesn’t look right, it’s leaving a copy of the @ symbol every time I move! We forgot to clear the screen after an action is processed. Let’s fix that by simply adding a call to libtcod console clear function:
while (!c.TCOD_console_is_window_closed()) {
    c.TCOD_console_clear(null);
    ...
}
The clear function takes a reference to the console we want to clear. Libtcod can actually manage multiple separate “consoles” allowing you to put boxes containing differently rendered content on the screent, switch between them, etc, null tells libtcod to clear the root console, which is the one we’re using.
Now we can rebuild and zoom around!
I generally like writing tests to cover my code but I’m still struggling a little with the Zig test system. Not because of Zig itself I don’t think but because I’m not sure exactly how pedantic to get yet. Here’s what I’ve got for tests so far in my main source:
// Extra little helper function to quickly create a TCOD_key_t struct with a given key in it
fn initKeyWithVk(initialVk: c_uint) c.TCOD_key_t {
    var k = initKey();
    k.vk = initialVk;
    return k;
}

test "evKeydown up" {
    const action = evKeydown(initKeyWithVk(c.TCODK_UP)).?;
    try expect(action.moveAction.dx == 0);
    try expect(action.moveAction.dy == -1);
}

test "initKeyWithVk should set given key on returned structure" {
    const key = initKeyWithVk(c.TCODK_UP);
    try expect(key.vk == c.TCODK_UP);
}
To run the tests just do: zig build test.
I like how easy this is. I love how Zig includes this all built-in to the language. It would be nice to have some kind of “data” based testing where I could write an evKeydown test that contains multiple tests inside it with just varying data. In Spock I would use a where clause and a little table of values inline to achieve this. In Zig it seems like I’d have to write 5 copies of an evKeydown test to cover the code fully.
This all may just be too small scale though. Writing a test for this very simple thing at this stage is kindof silly. We’ll see later on as the program grows what sorts of things I regularly break. Those are the things I’ll want solid tests for.
the doryen documentation for v1.6.4 (has c/c++ reference documentation) https://libtcod.github.io/docs/index2.html?c=true&cpp=true&cs=false&py=false&lua=false
libtcod c/c++ documentation https://libtcod.readthedocs.io/en/latest/